| CONSPICUOUS LIQUID CONSUMPTION |
| A
RE-EVALUATION EXERCISE OF THE NEW BODLEIAN EXTENSION SITE, BROAD STREET, OXFORD 1937 |
Methods of Calculating the Capacity of Pottery Vessels By J.R. Thomas and C.Wheeler |
|||||
|
When dealing with pottery assemblages, the capacity of the vessels is an important factor. "Scant attention has ever been paid to variations in vessel size, yet it is this parameter that should most directly relate to the use of any vessel as a container", Woodward (1997, 153) "Vessel volume is obviously as important as shape, if not more so, in the consideration of function", Barrett (2000, 216). When searching the literature to find out how to measure vessel capacity we found only a limited number of references e.g. Barrett (1980, 316). Woodward (1997, 155), and these gave no detailed calculations. This work discusses different methods of measuring vessel capacity and describes in detail the most appropriate method for use on medieval jugs, outlining some of the problems and sources of errors. Suggestions are given to make the methods easier to use. Also a set of tables (in Excel) is provided to carry out the calculations (see Table 5 and Table 6). There are various methods of finding the capacity of a vessel: 1) Where a complete vessel is available it can be filled with sand or a similar material and the volume of the material measured. Whilst this is the most accurate method, archaeological assemblages seldom produce complete vessels. 2) Where vessels have a uniform shape as with barrel-shaped jars or vertical-sided dishes it is possible to correlate rim size and vessel capacity (Woodward & Blinkhorn 1997). This is not, however, possible with medieval jugs where the shapes are many and varied. 3) With variably shaped pots the method used is to view the vessel as a pile of circular slices and then calculate the volume of each of these slices treating each as a truncated cone, for which there is a known formula. The smaller the height of these slices the more accurate the calculation. A full profile of the vessel and accurate measurements are needed. It is this method which is discussed in detail below. The 'Slices' MethodThis
method makes use of the technique of dividing the vessel into slices
and calculating the volume of each slice using the formula for the volume
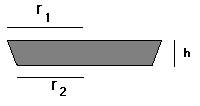
of a truncated cone Diagram 1 below
Where r1 is the radius of the top surface r2 is the radius of the bottom surface h is the height of the slice The method assumes the sides of each slice are a straight line. This is obviously unlikely to be the case. The vast majority of slices would have curved sides. If the slice has concave sides then the calculated volume will be more than the real volume. With a convex slice the calculated volume will be less than the real volume. Reducing the height of the slices reduces the error as the smaller each slices the closer in shape the calculated slice is to the actual slice. The procedure can be simplified by using the same size slices - 1.0 cm is generally used. To carry out the calculation we need to measure the top and bottom radius or diameter of each slice. If the actual pots or parts of pots are unavailable, there are two other ways in which measurements can be obtained - either from a pottery illustration or from a photograph. From a Pottery IllustrationIn using the pottery illustration, we rely on the accuracy of the measurements taken by the illustrator.(Orton 1993, 63) - only scaled accurate illustrations can be used. If a full size or half scale pottery illustration is available then the measurement can be taken directly from the illustration. With smaller scaled illustrations, each vessel should be enlarged to about A4 size either by scanning into a computer e.g. us Irfan View or expand on a photocopier. Care must be taken to ensure that the illustration is not distorted or stretched more in one direction while it is being enlarged. The measurements obtained from the enlarged illustration will not be the actual measurements but will be scaled. The spreadsheet produced to carry out this calculation adjusts for this scaling by using the actual height of the vessel. The easiest measurement to take is that of internal radius. A series of horizontal lines at 1 cm intervals is drawn on the illustration with the first line on the base of the vessel. On each line a measurement of the distance from the illustration centre line to the inside edge of the pot is taken. This gives the inside radius of each slice (see Table 5).
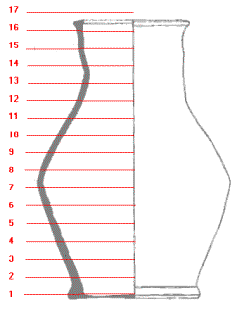
There are problems: 1). The vessel is unlikely to be an exact number of slices high, however, this will make little real difference to the accuracy of the calculation. In Diagram 2 if the top of the vessel is nearer to line 17 than line 16 then included the slice, otherwise ignore it.
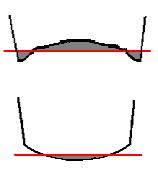
For a concave base place the line about half way up the base so that the area of the inside of the vessel below the line is matched by the area of the outside of the vessel that is above the line. This should minimise the error. For a convex base place the line as low as possible to minimise the area of the inside of the vessel that is below the line.
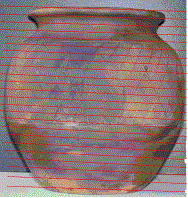
From a Photograph With a photograph, a similar procedure is followed as for an illustration but here we are measuring the outside diameter of the vessel. Again the photograph should be expanded to about A4 size (Photograph 1). A set of parallel lines 1 cm apart is drawn on the photograph parallel with the base of the vessel. This line should be across the centre of the base, not the front edge. This will depend on the angle at which the photograph was taken. We now measure between the two edges of the vessel for each line. From a photograph it is not possible to tell if the base is flat, or concave. We must therefore accept that if the base is deeply concave there will be some error in our calculation. As with the illustrations the vessel photography is unlikely to be a whole number of slices. Deal with this in the same way as we did for the illustrations. An added difficulty is deciding where the top of the vessel is, again we need the line to be across the centre line of the vessel. Further, we have measured the outside diameter of the vessel and therefore need to take the thickness of the vessel into account. The spreadsheet (Table 6) accepts a value for thickness and subtracts this from the diameters. This makes the assumption that the vessel is of uniform thickness and ignores the thickness of the base. If the thickness of the base is known then this can be used in the positioning of the first line drawn on the photograph so that it is aligned with centre line of the top surface of the base. For both illustration and photograph drawing the lines will take time and effort and some judgement will be needed in positioning the bottom line. To simplify and speed up the process, it is easier to prepare a transparent overlay bearing a set of horizontal parallel lines at 1 cm spacing with a vertical centre line. This overlay is then positioned on the illustration/photograph and the measurements taken along the lines of the overlay. The vertical centre line is needed for illustrations so that the radius can be measured. The Excel spreadsheets created to perform these calculations can be downloaded by going to:
The spreadsheets contain instructions for use. Table 5- The first measurement to enter is the height of the vessel - both measured from the illustration and real. These two values are used to calculate the scale factor that is used to convert the measured radius to the real radius. Next, enter the height of the slices e.g. 10mm. Below this are 3 columns: on the far right are the numbered slices 1 - 31; next to each slice enter the values of internal radius as measured from the illustration. The righthand column will change automatically as the internal radius measurements are entered. Here the value of (r1 * r1 + r1 * r2 + r2 * r2) scaled to the real value is calculated. These values are summed and entered into the formula 1/3 * PI * R * H where R is the sum of (r1 * r1 + r1 * r2 + r2 * r2) H is the height of each slice We have included a chart in the spreadsheet to show the profile of the vessel - this will highlight any values which have been entered incorrectly. Table 6 - from photograph. This has the same values at the top but also has the thickness of the vessel. We have to assume that the vessel has a constant thickness. Column 1 are the numbered slices. In column 2 enter the values of external diameter for each slice as measured from the photograph. Columns 3, 4 and 5 change automatically. Column 3 and 4 convert the measured diameter to a radius, scale it to the real radius, and subtract the vessel thickness. Column 5 calculates the value of (r1 * r1 + r1 * r2 + r2 * r2) which are summed and used to calculate the volumes as in the spreadsheet for the illustration. |
|||||
| List of Contents | Did size matter? | |
| Back to PotWeb | ||
|
© Copyright University of Oxford,
Ashmolean Museum, 2002
The Ashmolean Museum retains the copyright of all materials used here and in its Museum Web pages. last updated: 10-oct-2005 |
 2).
If the base of the pottery vessel is not flat then there can be some
difficulty in deciding where to position the first line.
2).
If the base of the pottery vessel is not flat then there can be some
difficulty in deciding where to position the first line.